To construct furniture using a biscuit joining machine, these are some suggestions: Make sure you choose the right size biscuits for your furniture, level the bottom shelf, and make sure that safety equipment is used. A biscuit joiner is a great tool for home improvements that require you to make joints between two pieces. Continue reading to learn more. Also, learn about biscuit glue, safety equipment when using a biscuit joiner, and more.
How to choose a biscuit joiner
Do-it-yourselfers may prefer a midrange biscuit jointer that can take most wood types. Cabinet shops might need a stronger model. There are many biscuit joiners that will suit your needs, regardless of what they are. Some have storage options and are easy-to-clean, while others are heavier-duty. Below are the factors that will help you choose the right cookie joiner.
There are many reasons why choosing a biscuit joiner can be important. It is a versatile tool that can be used for a variety of general applications. The Biscuit Joiner’s blade must be large enough to accept a variety of materials. Choose one that has a wide selection of settings and an ergonomic hand. A dust extraction port and bag are essential features. A biscuit joiner should be easy to use.
Choosing a biscuit
Before you buy a biscuit joiner, consider these factors. You will need to choose the right biscuit joiner for the job. Biscuits come as many shapes and sizes. There are three sizes that are common: #0, #10 and 12 to 15. Also, biscuits can be made from PVC, plastic or metal connectors. Blade size is another important feature to consider, as is the type of teeth. Biscuit joiners with carbide teeth are sturdier than others, so look for those features on the blades.

When choosing a biscuit joiner, you need to consider how much you will use it. Are you looking to make furniture? A midrange biscuit joiner can be used for general woodworking. However, larger projects will require a more powerful model. You can choose between a corded or cordless model depending on your needs. Once you've decided on the right biscuit joiner for your needs, choose the one with the maximum number of speed for maximum control.
Gluing biscuit joints
A biscuit joiner, which is used for joining wooden pieces, can be useful. Like nails, biscuits absorb glue and expand to create a perfect alignment. Insufficient glue can lead to joint failure or misalignment. You can avoid this by using a water-based adhesive. Be sure to squeeze the glue into the slot, rather than onto the biscuits. Popsicle sticks can be used to spread glue and ensure biscuits are secured to the wood.
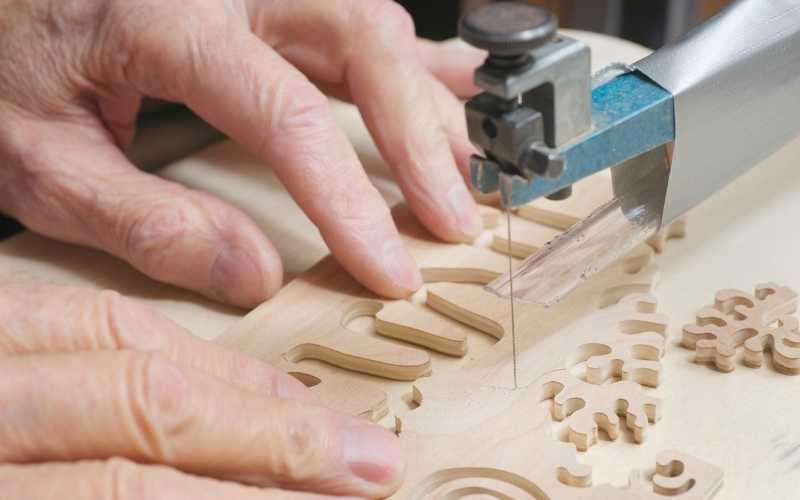
A biscuit joiner uses a saw to cut a slot through the wood and then drop compressed wood biscuits in that slot. Glue makes the biscuits stronger and lasts longer. A biscuit jointer is typically used to join panels. Norm Abram shows how he glues a panel together using a biscuit joininger.
Safety equipment to use with a biscuit joiner
Every user of a biscuit jointer should be aware that there are some safety precautions. These precautions include not turning on the biscuit joiner when it is in use, not straining or pulling the power cord and not reaching under the workpiece while running the cutting blade. Make sure your cutter head and blade covers are secure. Never leave the cutter head on while the blade is being cut.
You can use the biscuit joiner to cut biscuits with one hand. Make sure to secure your workpieces to a stable surface to stop them moving during the process of cutting biscuits. Inadvertently cutting too deeply into the biscuit joiner can cause serious injury. The blade may snap through the board if it is accidentally cut too deeply. Always wear safety glasses.
Check out a biscuit joiner
You need to learn how to test a biscuit joiner before you use it. You can do this by milling a slot into a scrap piece of wood. Place the biscuit into the slot and gently push it out. Mark the bottom of the biscuit with a pencil. After the biscuit is fully inserted, you can remove it from its slot and inspect the other side. You must ensure that it isn’t jammed, blocked or has no other objects.
Moreover, biscuit joiners come in a variety of sizes. You can choose the one that's most suitable for your needs and budget by checking out their features. There are two types to choose from: handheld or floor-mounted biscuit jointers. You can choose one based on the size of the job you have in mind. You can then choose the size that best suits your needs. The Biscuit Joiner 90deg, for example, is lightweight with a maximum angle at 90 degrees.
FAQ
What else should I know about woodworking in general?
Furniture making is a laborious task. It's easy not to appreciate how hard it is. Finding the right type of wood is the most difficult aspect of this process. There are so many options for wood, it can be difficult choosing the right one.
Another issue is that wood does not have the same properties. Some woods will warp over time, others will split or crack. These things should be considered before you buy wood.
Where can I find my woodworking tools?
There are many places where you will find everything that you need. For example, you could visit local hardware stores or look online at websites like Amazon.com.
For furniture and other materials that you can reuse, check out flea markets and garage sales.
How can I keep my shop organized?
Setting aside an area to store tools is the first step in keeping your workshop organized. Your tools will stay sharp and ready to go when they are free from dust and debris. You can hang tools and accessories with pegboard hooks.
What kind wood should I use for my project?
The most popular types of wood used in woodworking include oak, pine, birch, maple, cherry, mahogany, teak, poplar, redwood, and bamboo. Every type of wood is different and can have a unique look and feel that will affect the final product. Oak is a darker wood and tends to be more durable than other types. Birch is lightweight and soft while mahogany is heavier and denser. You can also choose between solid wood and veneers. Veneers consist of thin sheets made from wood and glued together to form a single layer.
How much money does a hobbyist have to put into getting started?
A lot of capital is required to purchase the necessary supplies and tools if you want to start your own woodworking shop. It's a good idea to buy a small tablesaw, drill press and circular saw. These items aren't very expensive, so you won't break the bank.
Are you a genius in order to master woodworking?
No. Woodworking is not difficult. You can create beautiful pieces of art by learning how to use simple power tools.
How do I know what tools are best suited for me?
It helps to reflect on your needs and preferences before you shop for tools. Do you prefer metal or plastic handles What size screws and nails do you use most often? Would you rather use hand tools than power tools?
Statistics
- Overall employment of woodworkers is projected to grow 8 percent from 2020 to 2030, about as fast as the average for all occupations. (bls.gov)
- Woodworkers on the lower end of that spectrum, the bottom 10% to be exact, make roughly $24,000 a year, while the top 10% makes $108,000. (zippia.com)
- The U.S. Bureau of Labor Statistics (BLS) estimates that the number of jobs for woodworkers will decline by 4% between 2019 and 2029. (indeed.com)
- If your lumber isn't as dry as you would like when you purchase it (over 22% in Glen Huey's opinion…probably over 10-15% in my opinion), then it's a good idea to let it acclimate to your workshop for a couple of weeks. (woodandshop.com)
External Links
How To
How to make wood joints
This tutorial will teach you how to join two pieces wood together. We will use the "pockethole joint," which means that we drill holes in the wooden pieces and then glue them together. If your wood is straight and flat, this method will work well. You may want to consider other methods, such as dowel joining. Here are the steps
-
Drill Pocket Hole Joints. First, measure the area where you wish to place the pocket joint. With a handheld drill machine or jig saw, drill 3/4-inch deep holes in the ends of each piece.
-
Sand Smooth. Sanding the wood's edges will help ensure that the joint won't split later.
-
Glue both sides together. Apply glue on both sides of the wooden plank. Allow it to sit for approximately 5 minutes before you clamp the pieces together.
-
Connect the pieces. After the glue has dried completely, you can clamp the pieces together until they are flush.
-
Trim Joinery. After the glue dries completely, trim off any excess wood around the joint.
You should leave enough space between the pieces to allow you to turn them inside-out.