
Have you had problems with your scroll-saw's blade tension? You aren't the only one. Many people have difficulty determining the correct tension for scroll saw flower patterns. This article will provide information on blade tension, stacking and the Workpiece footlock. Also, how to identify each part of your scroll saw. This article will help you to understand what to do and how to adjust tension for flower patterns.
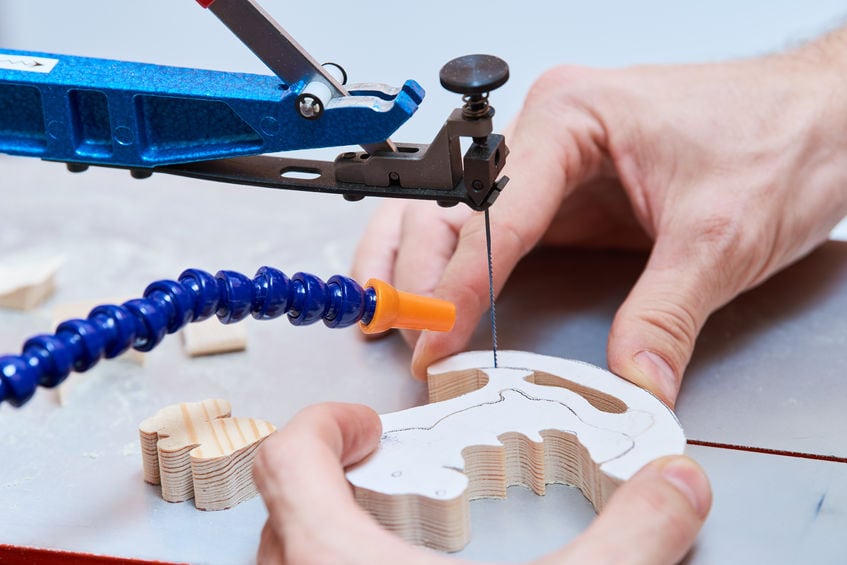
Adjusting blade tension for scroll saw flower patterns
When using a scroll saw, it is essential to use the right blade and adjust the blade tension. The scroll saw may not work properly if these two elements are not correctly adjusted. The blade may come in any style but the tension settings should match the design. Scroll saw manufacturers often have their own ways to adjust the tension. For the best instructions, consult your manual. These are some useful tips.
First, ensure that your table is square with your blade. This can be done using a small square and a protractor. Your scroll saw's tilt will also not be accurate. They should be checked regularly. Once you have established the blade-tension, it is possible to cut flower patterns. You should not tighten the blades or make them too loose.
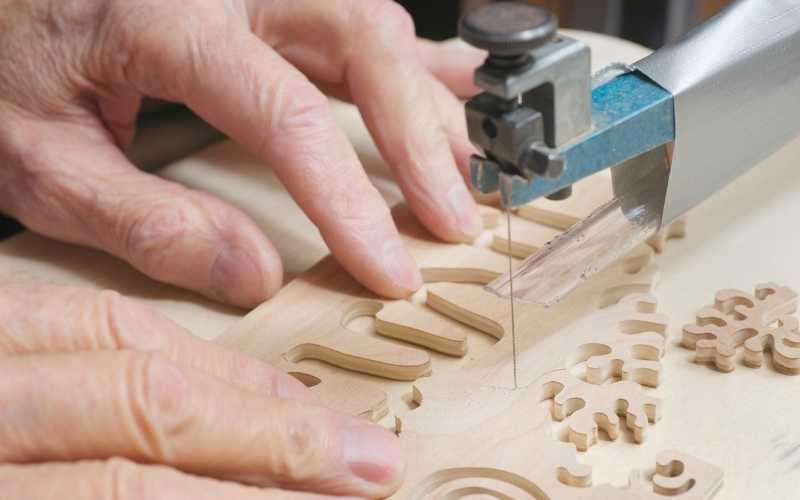
Stack cutting
You can create a scrollsaw flower pattern by stacking pieces of wood together. To hold the pieces together, you can use double-sided tape. To secure their stacks, some scrollers use toothpicks or small nails. Staples and old circular saw blades can be used as binding tools. This will prevent the layers of material from shifting. Once each layer is secured to the previous, you are ready to begin cutting.
Magnification is a great option for precise cuts. A magnifying glass mounted on the scroll saw or a lens for the tool is useful. You can also purchase a magnifying LED lamp to brighten your work space. To make it easier to move around your work area, some work lights have a magnetic base or clamping base. There are many kinds of scroll saws. You can choose the one that best suits your needs.
Lock the workpiece foot
There are many options for choosing the right scroll saw drop foot. The foot should be placed on the workpiece and should not drag. After making adjustments, be sure to tighten the footlock on your workpiece. Next, turn the speed adjustment knob to the desired setting. This will depend on the material to be cut, how thick it is, and how many teeth the blade has. Finally, make sure to secure the workpiece in your drop foot.
Scroll saws are not for every job. These scroll saws are for specific jobs. You should use the workpiece feet lock to ensure that the wood is secure while you cut flowers. This will prevent the workpiece from moving while you are cutting. It is also important to consider the weight of the workpiece you plan on using. A larger blade might be a better choice if you are planning to cut large flowers.
Identifying parts of a scrollsaw
Scroll saws can be classified by their throat size. This is the distance between blade and rear frame. The throat size is a measure of how big wood can be cut. Larger industrial saws have deeper throats, while smaller saws have shorter throats. Before computer automation, larger objects could have been cut with industrial saws. A basic scroll saw should suffice for most home-based projects.
A free flower scroll saw template can help you get started if you don't know where to start. These patterns also come with detailed instructions. They are simple to follow and can be used as beautiful decoration. You can also use them in your classroom or kitchen as a decorative item. You can also make practical items with scroll saws. It can be difficult to identify the parts of a scrollsaw flower pattern, but it is possible!
FAQ
How do you calculate woodworking costs?
When calculating the costs of any project, it is important to keep them as low and affordable as possible. Always ensure you are getting the best possible price for materials. It is important to take into consideration all factors that can impact the cost of your projects. These include time, skill and experience. If you want to get an idea of what you can expect to spend on different types of woodwork projects, check out our guide to the average price of common household DIY tasks.
What kinds of woods are good for making furniture?
Woods are classified by their hardness. Softwoods include pine, fir, cedar, and cypress. Because they resist rot, softwoods can be used to make outdoor furniture. You can find hardwoods like oak, maple, mahogany, teak, and others. They are generally indoors as they don't weather well outside.
Where can I find free woodworking plans?
To find free woodworking plans, you don't have to buy any magazines or books. You only need to Google search. Search Google for "free woodworking" to see hundreds of sites that provide free plans.
How much will it cost to get started?
Since every project differs, it is impossible to give exact numbers. These are the factors that will give you an idea of how much you'll need.
-
Material cost
-
Tools and equipment
-
Time spent working on the project
-
Your hourly rate
-
How much profit can you anticipate to make
-
It doesn't matter if your goal is to hire help
For those just beginning, it may be a good idea to start small with simple items like boxes and picture frames. You will gain more experience and be able to tackle larger projects.
Where do you start when it comes to woodworking?
You can learn the most effective way to build furniture by actually building it. While you will need tools and make mistakes, you will eventually master the art of building furniture.
Begin by choosing the project that you want to finish. You can make a simple box or a large entertainment center. Once you've decided on a project, find a local woodworker who specializes in that kind of work. Ask him or her for advice on what tools you'll need and where to find them. You might even ask whether there's someone else you can talk to who does this kind of work.
Statistics
- Woodworkers on the lower end of that spectrum, the bottom 10% to be exact, make roughly $24,000 a year, while the top 10% makes $108,000. (zippia.com)
- Most woodworkers agree that lumber moisture needs to be under 10% for building furniture. (woodandshop.com)
- If your lumber isn't as dry as you would like when you purchase it (over 22% in Glen Huey's opinion…probably over 10-15% in my opinion), then it's a good idea to let it acclimate to your workshop for a couple of weeks. (woodandshop.com)
- Overall employment of woodworkers is projected to grow 8 percent from 2020 to 2030, about as fast as the average for all occupations. (bls.gov)
External Links
How To
How to join two pieces of wood together without nails
Many people love woodworking. Woodworking can be a fun hobby because you can work with your hands to make useful objects from wood. There are times when two pieces of wood need to be joined together. This article will help you to maintain the beauty of your woodwork projects.
First, remove any sharp edges from the wood pieces before you join them. Sharp corners can cause problems down the line. Now it's time to start glueing your boards together.
If you're working with hardwood, you should only apply glue to one side. For softwoods like cedar and pine, glue should be applied to both sides. Once you have applied the glue, press down on the boards until they are fully attached. Before you proceed to the next step, be sure to let the glue dry completely.
Once you've glued your boards together you will need to drill holes in the joints to accommodate screws. These holes will differ depending on the type and size of screw you are using. If you plan to use a 1/2 inch wood screw, drill a hole at least 3/4 inches in depth.
After drilling your holes, drive the screws into the board's backside. Be careful not to hit the front surface of the board, or else you'll ruin the finish. When driving the screws, try to avoid hitting the ends of the screws too much. This will prevent splitting the wood's end grain.
After your project is completed, you will need to protect it from the weather. You can either cover the entire furniture or just the top. Either way, you'll want to use a product that will last for years to come. You can choose from oil-based varnishes or polyurethane, shellac and lacquer as examples.
These products are available at most home improvement stores. It is important to ensure that you purchase the correct product for the job. Keep in mind that certain finishes can be toxic and should not be used indoors. When handling certain finishes, wear protective gear.