A bandsaw is only as good or as sharp as its blade when it comes to cutting tight curves. The blades on the cheaper models are often less expensive. Professionals will often have multiple blades. DIYers may only have one. There are many things to take into consideration when choosing the best bandsaw for tight curves. The type and depth of the cut should determine the blade's width. For delicate work and straight cuts, narrow blades will work best.
Variable pitch
A Variable Pitch saw blade may be right for you if the task is tight. Read on to learn how to select the right blade. This blade is capable of cutting tight curves and closed openings with ease. First, create relief cuts around curves to give the blade more room to turn. Remove the first piece of debris to clear the path.
The main advantage of this band saw blade is its high-quality teeth. Band saw teeth are subject to multiple forces when they cut through two walls made of tube steel. As the saw advances forward, it releases the tooth by the downward feed force. Thicker chips, on the other hand, tend to stick to teeth and cause problems with the cut quality. The groove geometry allows for proper coolant flow, which helps flush out any chips stuck to the teeth.
Regular-tooth
It is best to use a wider blade when cutting curves. The width of the blade determines the smallest radius of cut. Smaller width blades are used for tight curves, and large width blades are used for near-straight line cuts and resawing. To determine the correct blade width for any given job, refer to the table below. The chart also provides general guidelines for blade width selection.
Keep in mind that a regular-tooth saw blade can be used for tight curves, but it will also be exposed to higher temperatures. This means that the blade will require more force to be able to cut a certain part. Also, the blade will tend drift in one particular direction while cutting, increasing the possibility of smoke and burns. To prevent this, you can apply a layer of beeswax or tape on the blade to provide lubrication.
0deg. Angle of the rake
To achieve the best results when cutting tight curves, use the 0deg. A band saw blade's rake angle should be set for best results. This angle is important for maintaining the cutting edge's straight edge and minimizing buildup. While the rake angle can't be measured directly, it can be estimated using a force gauge which acts in the same direction as the cutting edge. Additionally, the cutting ratio values can be measured empirically, either directly or indirectly.
To determine the best angle for rake, measure the radius of the cut that you are trying to make and compare it with the kerf. Be aware that different bands saw blades will produce different kerf sizes. It is important to understand the materials used to make the blade. To test the angle of the bandsaw blade's rake, you can use a piece of scrap wood.
Wood Slicer
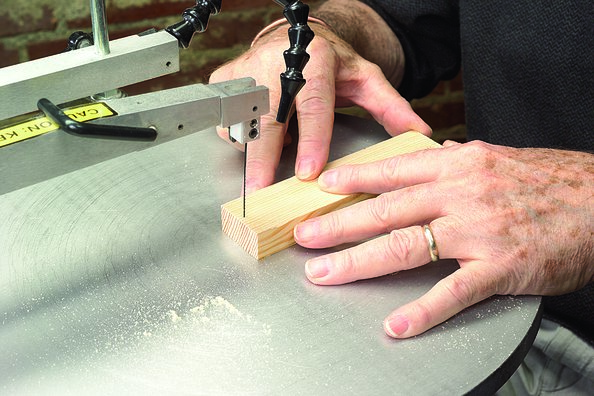
The band saw is versatile and can be used to cut straight lines or close openings. Make a few relief cuts on your workpiece to make it easier. This gives the blade more room for turning. You should also make sure that you remove any waste from each cut. This will give it more room for turning. When you are done with the workpiece close the blade.
A 1/4 inch blade is ideal for small inside cuts and curves. The 1/4-inch blade will allow you to make tight inside cuts without causing the blade to drift. But for a more accurate cut, you'll need to make intersecting cuts first before cutting. Make sure to set your saw's depth gauge to avoid binding, especially on tight curves. You can also use a larger blade but with a smaller radius.
Freshcut 37

The Freshcut 37 bandsaw blade will allow you to cut tight curves on your bandsaw. The blade has a relief cut which allows it to finish the curve and move on to the next steps. The blade works around the cut, and makes small pieces of waste to make room for turning. Always back out every cut when you are cutting the curve. This will keep the saw from twisting as you cut the next curve.
If you plan to cut many tight curves on your bandsaw, you should consider purchasing a variable pitch band saw blade. This blade can be used to cut more materials such as wood, metal and plastic. This blade's variable pitch is ideal for many different applications. It is perfect for cutting any type of metal such as plastics and composites. This bandsaw blade is heat-treated steel and durable for extra durability.
FAQ
What are the basics of woodworking?
The best way to learn how furniture construction is to make your own bench. This project can be completed with whatever wood you have available at home. If you're not sure which kind of wood to choose, you can purchase cheap pine boards at Lowes and Home Depot. After building your bench, sand off any rough edges and apply a stain or varnish.
Which material would you recommend for woodworking lessons?
You can start with softwoods like pine or poplar. After you are comfortable with the softwoods, move to hardwood.
What amount of money do I need to get started with my business?
Because each project is unique there are no exact numbers. Consider these factors if you need to estimate the amount of money that you will require.
-
Material costs
-
Tools and equipment
-
Time spent working on the project
-
Your hourly rate
-
What profit are you expecting to earn?
-
No matter if you are looking to hire someone
It's a good idea for beginners to start with small projects like frames and boxes. As you gain more experience, you will be able tackle more complicated projects.
How do you know which type of wood you are working with?
Always verify the label on wood purchases. The label should contain information about the wood species, its moisture content, and whether it has been treated with preservatives.
How do I calculate woodworking prices
When calculating the costs of any project, it is important to keep them as low and affordable as possible. You should always try to make sure that you are getting the best deal on materials. It is important to take into consideration all factors that can impact the cost of your projects. These include time, skill and experience. To get an idea about the average cost for common household DIY tasks, see our guide to the average woodwork project price.
Statistics
- Most woodworkers agree that lumber moisture needs to be under 10% for building furniture. (woodandshop.com)
- The U.S. Bureau of Labor Statistics (BLS) estimates that the number of jobs for woodworkers will decline by 4% between 2019 and 2029. (indeed.com)
- If your lumber isn't as dry as you would like when you purchase it (over 22% in Glen Huey's opinion…probably over 10-15% in my opinion), then it's a good idea to let it acclimate to your workshop for a couple of weeks. (woodandshop.com)
- Overall employment of woodworkers is projected to grow 8 percent from 2020 to 2030, about as fast as the average for all occupations. (bls.gov)
External Links
How To
How to make wood joints
This tutorial will show how to join 2 pieces of wood together. The "pocket hole joint" is a method whereby we drill holes into the wood and glue them together. This method works great if your wood is straight and smooth. You may want to consider other methods, such as dowel joining. Here are the steps
-
Drill Pocket Hole Joints. You will need to measure and mark the exact location of your pocket hole joint. Next, drill 3/4 inch holes in each end of each piece using a handheld drilling machine or jigsaw.
-
Sand Smooth. Sanding the wood's edges will ensure that the joint doesn't split.
-
Glue Together. Apply glue on both sides of the wooden plank. Let it sit for about 5 minutes before clamping the pieces together.
-
Fix the Pieces together. After the glue has dried thoroughly, secure the pieces so that they are flush.
-
Trim Joinery. After the glue dries, trim any excess wood around your joint.
Make sure to leave enough room between the pieces so that you can turn them inside and out.